As surfaces for bearing technology become more and more smooth, conventional techniques such as laser or stylus profilometry come to their limits for determining surface quality.
But slight differences in surface roughness and structure of bearing components are found to have immense influence on component life and performance. AFM measurements are therefore used to assess surface quality parameters such as roughness parameters and nanoscale surface structures.

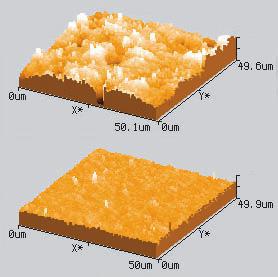
The images demonstrate that surface quality of steel balls for wear testing still varies widely between manufacturers. While the upper surface is structured by open pores indicating inferior material quality, the lower image shows a smooth surface as required for high performance applications. Mean surface roughness values (Sa) were 21 and 6 nm, respectively. Both balls were nevertheless sold as being of the same quality standard.
All measurements were performed in "Static Force" operating mode at EMPA (Switzerland).
View application note (PDF)
